Showing posts with label yummy goodness. Show all posts

Sunday, August 31, 2025

Fruits of our Labor

It’s Labor Day weekend here in the States, a time when we celebrate the fruits of our labor, and allow ourselves time and space to reflect on the work that has been.

The garden harvest turns to fall-colored things, deeply colored and golden. My favorite winter squash is delicata, the first variety to come to harvest, and one of the simplest to prepare, almost as if the garden said, “Here, take a rest and enjoy the fruits of your labor.”

Delicata plants are prolific, inviting us to gather friends, tell them to fetch a squash from the vine, and tell stories as they roast whole in the oven for 45 minutes. 

Set a pot of black lentils up while the oven is going, and serve as a hearty side. Start with a salad of baby kale and baby spinach, the first tender leaves coming forth from the second planting, and top with sunflower seeds and dried cranberries. Dress with garlic apple cider vinaigrette. 

Thursday, July 27, 2023

Quiche

Let's talk about Quiche: The success ratio for quiche is  1 part egg to 2 parts dairy, by weight. A standard large egg weighs two ounces and 1/2 cup of dairy (whole milk) is four ounces, therefore a handy 1:2 ratio. The dairy should be whole milk or cream or a combination -- my faovrite off the shelf dairy for quiche is half-and-half.  If you're using whole milk, that's all good too. The number of eggs and volume of cream you'll need vary depending on the overall volume of the dish you're baking in. I like a deep dish quiche, so I use a ramekin, but it's fine to use the standard pie plate. Whatever you're using, fill it with water to the place where you'd like your quiche level to be, then pour that into a large measuring vessel to get a good idea of how many eggs and how much cream you'll need. A standard 9" pie pan usually needs 3 eggs and 1.5 cups of dairy; deep dish can take up to twice that, which is lovely if you're swimming in eggs as I sometimes am. 

If you use a crust for your quiche, you'll want to par bake it (baking it almost fully) befor adding the custard mix so that the crust doesn't get soggy during baking. I frequently skip the crust, which makes people call this a frittata, but okay, it's not. If you're trying to cut carbs or need to be gluten free, skip the crust. If you have extra time and don't mind, by all means make a crust  The buttery flaky goodness really shows off the eggs and is a perfect blend of flavors. Whatever you choose, make sure your crust comes high enough to hold the quiche, preferably over the edge of the baking dish. I like to keep a couple crusts in the freezer for deep dish pie plate quiche, but if you're going with a ramekin, the easiest thing to do is usually to make the crust and then press it into the (pre-greased) ramekin after rolling it out. Baking a crust is pretty forgiving, and is an ideal activity for a warming oven. Once it gets to 325, pop the dish-with-crust into the oven and let it do its thing for about 20-30 (first twenty minutes with pie weights / beans to keep its shape) minutes or until browned.

For fillings, you can choose literally anything, and this makes quiche the perfect companion to seasonal cooking. Whatever vegetables and cheese you have on hand, especially the ones that are on their absolute last day for useability, are exactly the ones you need for quiche.  Leftover meats are great too as long as they are already cooked and drained or dry. Ideal volume of filling is about a cup each of cheese and vegetables (including meats here), but it's not going to wreck anything if you have less (they quiche will simply be more eggy). They key here is to make sure your filling ingredients are dry so that they don't make the quiche watery during baking. Tomatoes are esecially notorious for wrecking a quiche, and can be handled by chopping the tomato in advance and letting the juice drain. They will still impart a little water during baking, so if you use tomatoes, try to pair it with a very dry cheese (like feta). My favorite quiche is the basic custard with gruyere cheese and no vegetables at all, a dash of nutmeg and black pepper whisked into the base. Whatever you're using, layer half the cheese evenly on the crust, then add the vegetables, then add the remaining cheese on top. Pour the egg and dairy mix over the filling. 

For a very deep ramekin, hotter is better -- I like 425-450 -- but for a pie plate, you can go as cool as 350. 

Place the dish on a baking sheet, and bake 40-50 minutes, until the edges are set but the middle jiggles just a a touch. Cover the quiche with tinfoil if you're concerned that the top or crust might burn. Let the quiche rest for 15 more minutes after removing from the oven -- this will finish the cooking proess and set the middle of the quiche. Serve at room temperature or cooler. 

Some classic fillings:
Broccoli & Cheddar
Ham & Smoked Gouda
Spinach & Mushrooms
Swiss Chard & Bacon 

Tuesday, July 25, 2023

Oven-Steamed Salmon

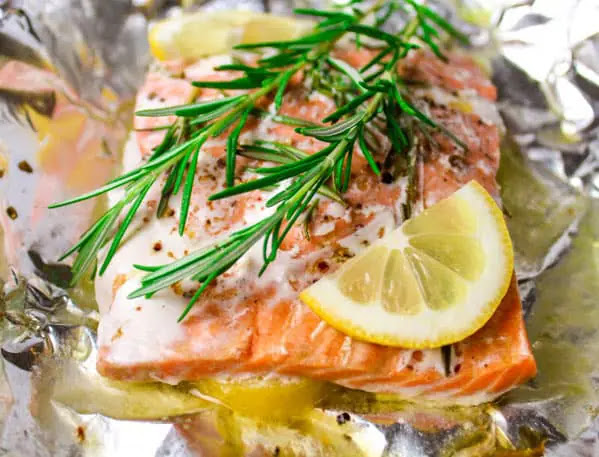
I love steamed salmon, and in recent months I've dicovered that salmon helps cure a basketful of aches and ailments, which is just another reason to indulge in my favorite dish: oven steamed salmon in parchment. It's super simple and you can adjust vegetables and herbs for your whim of the moment. 

Place a filet of salmon (or cod is nice, too) on a piece of parchment paper on a baking sheet.
Place slices of cucumber or lemon on top of the filet.
Lay fresh green beans or spears of broccoli alongside the filet.
Add a sprig of rosemary and some freshly ground black pepper.
Drizzle with olive oil and lemon.

Fold the parchment paper into a tent around the salmon and twist the ends to seal.
Bake at 400 for ten minutes, enough to steam the filet and vegetables.

This recipe is perfect for a warm oven after baking bread or roasting root vegetables or making quiche -- anything that bakes at 400+.

Thursday, May 4, 2023

The No-Touch, Quasi-Sourdough Recipe

The No-Touch, Quasi-Sourdough Recipe

Real bakers will tell you that you have to weigh everything, and that volume measurement is insufficient. They know what they speak of, but I’m using volume measurements anyway. If you are lucky enough to have a kitchen scale, I have the weights noted as well. Bread is forgiving and it loves you. All will be well.


Some of the nutritional benefits of this bread: it has no sugar, added fats, or preservatives. Also, by having a nice long rising time, it is a fermented bread, which means that lots of people who are gluten sensitive can eat it.


Equipment

A large bowl — think “the popcorn bowl,” big enough to hold a whole bag of microwave popcorn. Mine is about 4 quarts, and I wouldn’t go much smaller.

A whisk. Any kind will do. I use a straight ball whisk, but that’s because I already have it. You could use a fork and it will be fine.

A wooden spoon, any variety.

A cast iron pot/pan with a lid, not overly large. This is where things get specific and tricky. I use a loaf nest, and have great results. It’s pricey, and heavy as well. I hear that you can use a basic cast iron Dutch oven of any sort, but I’ve not been able to get decent results in the oven (I got great results when using this method in the wild, on actual coals and with a fire pit, but not the oven.) Le Cruset and other name brands have similar enameled cast iron bread cloches, and they are (somehow) even more expensive. If you find that there’s a cheaper, less equipment-specific solution, please let me know. 

A silicone or parchment paper liner to help make lifting the finished loaf easier.

A lid large enough to cover the bowl, or plastic wrap


Ingredients

1/4 teaspoon yeast (.5 g)— really it’s just enough grains to get it going.

1.5 teaspoons salt ( 8-10 g) — I use about 10g, and I like Himalayan (pink) mineral salt, as it seems to give the dough a deeper flavor character. I have thoughts on many different kind of salt (grey, black, Celtic, etc), but go with what you have. Try to avoid iodized salt, as it can change the whole reactivity that we’re after.

1.75 cups (14 ounces) of water (400g) —if you have access to filtered water, this is ideal. If not, you can let the water sit on the counter for a day or so to let the chlorine evaporate.

4 c. Flour (500 g) — you’re going to want to avoid most “all purpose” flours because they don’t have enough protein to make the reaction happen. For store bought, I like King Arthur Unbleached all purpose. You’ll know it’s the right one because it has a little “11%” badge on it, indicating that it has 11% protein. This is the right one. 


Method

  1. Mix the yeast, salt and water together in a large bowl with a whisk until blended. This might take a couple applications. The yeast can be reluctant to dissolve, but once it does the liquid will become cloudy and the salt will get in on the action too.
  2. Add about half the flour and blend with the whisk until everything is damp. There will probably be bubbles happening in the flour as it hits the yeast. This is all wonderful.
  3. Add the remaining flour and mix with the wooden spoon (or you can use the whisk still if you prefer — I find it gets a little clumpy on the whisk as it starts to become dough). Don’t drive yourself crazy here — this is just to make sure all the flour is incorporated into the moisture. It will be a soft dough, a little stiffer than a batter.
  4. Once everything is combined, cover the bowl with a large lid or plastic wrap. The goal is to keep it warm and prevent it from drying out.
    The whole process up to this point should only take a few minutes. If you’re having misgivings, call me and we’ll video chat while you do these steps, and I can reassure you that all is great.
  5. Place it in a nice cozy spot for 12-18 hours. It should double in volume and have a tangy aroma.
  6. Preheat the oven to 450F (230 C). Place the bread pan and its lid (the cloche) inside (without the silicone liner, if you’re using one) to warm for 45 minutes.
  7. The pan will be scary hot at this point. Take the cloche out of the oven and insert the silicone liner in the lower portion. Scrape the dough into the lower half of the cloche — I use the wooden spoon to sort of coax the dough out, and it usually rolls right into the pan.
  8. Put the lid on the cloche and transfer the pan back into the hot oven. 
  9. Bake for 45-60 minutes. I usually end up setting the timer for 50 minutes. 
  10. Take the lid off and let it bake another 10 minutes if you like a crunchy crust (which I do). It also makes the whole thing less weighty when removing it from the oven.
  11. Remove the cloche from the oven and lift the loaf out of the pan (still using a hot mitt — the liner is hot too!) and gently peel the liner away from the loaf.
  12. Let it cool.
    This is easily the hardest part of the whole process! But it’s important. If you cut it before it cools, the whole thing will get sticky and collapse into something somewhat less than bread. Cooling is actually part of the baking process.
    Feel free to take pictures and send to your friends. Invite them over, even. Or keep the whole thing to yourself.  Also of note is that this bread makes  delicious croutons — the texture is just lovely for it. Cut the day-old bread into cubes, toss with olive oil (and any herbs you’re into at the moment) and broil on a sheet pan for a few minutes, stir, and broil again, repeating until they are as crisp as you prefer.

Thursday, December 22, 2022

Oatmeal

It’s been raining buckets all day, and I haven’t wanted to do a thing, so mostly I didn’t. (Except the gym, which was amazing.)

Slow cooker oats was just the right foil to the day’s chill, with enough left over to set aside for the duration of the winter storm.

I use freshly rolled oats, but any variety of old-fashioned oats will do. (If you need them to be gluten-free, make sure they are processed at a gluten-free facility; while oats don’t have gluten, they can pick it up on the equipment from other grains. If you only have quick-cooking oats on hand, it’s all good, they just won’t be as creamy and they have a bit less nutrition, but they’re still wonderful.)

Method
Stir one cup of rolled oats into 3 cups of water* (double or triple or halve or whatever mathematics make sense to you and your equipment / size of your army**) in a 2-quart slow cooker. I like to add in a little cinnamon for cooking, but it’s totally optional. They say a dash of salt is optional too, but i find it makes a world of difference.

Cover and cook on low for 8 hours or overnight.

The oatmeal will have much less definition than you’re probably used to, but it will be super creamy tasting. To enhance the creaminess, you can add some actual fresh cream at this point—the slow cooked oats will really incorporate it well.

Scoop out and serve in a bowl.

I like mine topped with freshly grated ginger, Vietnamese cinnamon, and some jumbo flame raisins.

Some folks go the peanut butter and banana route, or the berries and walnuts route, or the swirl of Nutella route. It’s a wonderful base for any of the toppings you’re into at the moment and have on hand.

*Any liquid, really — I hear half milk and half water makes a really nice balance, and I’m looking forward to trying it. I would recommend whole milk if you go this route. I am also considering going straight three cups of milk and having that replace my morning yogurt. Want to make it dairy free? Go with almond milk!

**Leftovers keep in the fridge for up to five days.


Sunday, January 10, 2021

Golden Noodle Heal All

Homemade golden noodle soup that is a bowl of coziness and comfort during the dark chilly days of winter. Even better after it married for a day in the fridge.


Wednesday, July 29, 2020

Bread Class: Sourdough Starter

If you're looking to make a sourdough starter, I like this recipe from King Arthur. It takes five days, and you can use whatever flour you have on hand. Rye is traditional; this one calls for whole wheat; I've used pretty much whatever was available and had good results. 

The trick to starter is that it is a fermentation. Your first loaves using the batch will likely not have that characteristic tangy smell and flavor, since the starter hasn't aged long enough. The good news is that it will still perk the bread along quite nicely. Don't give up; just keep using the starter to make more bread -- give it away to your neighbors and friends, and you'll be the hit on the block.  In a couple months of regular baking and feeding, and your loaves will have that sharp classic flavor.

My recipe makes two loaves, and now that I live alone I give one loaf away out of every batch. I always smile when people point out that I could freeze the second loaf, which is true, but has nothing to do with why I make bread. Some days I make a second batch the day after "Bread Day," meaning I give away both loaves since I'm still working on the one from the day before.  Generally, I make bread twice a week for my own consumption. Any baking other than that is for mental health.

Storing it: I store my bread in a brown paper bag, cut side down. It lasts about three days (if it's not eaten by then) before it gets overly hard and I cut it into strips to dry out completely for dog treats.